Developing Your Electrical System Part 1 - Basic Preparation
By Tony Bingelis (originally published in EAA Sport Aviation, April 1990)
YOUR situation may be much like my own.
I already have an alternator for my Lycoming 0-320 engines. It is a small Toyota unit rated at 35 amperes. Naturally, I would prefer to use it in my RV-6 rather than buy another alternator... provided it can handle all the electrical equipment I plan to install.
The battery I intend to buy (at the very last minute) is a 30 Ampere Gell Cell because it is to be located inside the cockpit by my feet.
Before getting into any other electrical details my first objective was to determine if I will have an electric capacity problem with that combination of alternator and battery. In other words, will my equipment be using more amperes in flight than I will have available?
Consider this situation. If my electrical load (ampere use) in flight is 45 amperes and my alternator is rated (current controlled) at 35 amperes, the alternator will, nevertheless, only be capable of supplying up to 35 amperes. Right?
Any current utilization over 35 amperes (in this example, 10 amperes) will, therefore, have to be drawn from the battery until the electric load is reduced, or until the battery is drained.
Now, consider this. If my current utilization is only 25 amperes, the alternator will happily supply the entire 25 ampere load and will, in addition, charge the battery at up to 10 amperes or less, depending on the state of charge in the battery . . . and that's just fine, isn't it?
Well, what about a generator? Wouldn't it do the same?
THERE'S THIS THINGABOUT GENERATORS . . .
In flight a generator would perform as well as an alternator, of course. However, besides being a heavier, low ca pacity unit, it has another undesirable characteristic.
If you plan to use a generator instead of an alternator, your battery will, most likely, have to supply all of the electrical utilization loads during the landing and taxi phases of each flight. This is so because a generator ordinarily cuts out any time the engine rpm falls below 1,000 to 1,200. An aircraft so equipped - especially one that is typically flown for only short flights - will soon have a completely drained (dead) battery on board.
This handicap, generally, is not a problem when you are equipped with an alternator because it is capable of providing power at very low engine rpm.
Well, let’s see now I will fare with my small 35 amp alternator installation.
A SAMPLE UTILIZATION LOAD ANALYSIS
With the help of the data in Table 1, I worked out an abbreviated UTILIZATION LOAD ANALYSIS (that means I simply totaled the numbers). Going through all that work did convince me that my arbitrarily selected alternator/ battery combination will, indeed, adequately handle all of the electrical loads I will normally impose on the system . . . and do it without requiring battery recharging between flights.
Notice, however, the very heavy current draw that will take place, for approximately half a minute, during every engine start . . . no wonder a battery needs to be in good condition.
I used the rated current requirements (loads) for most of the electrical units I have, but was forced to rely on a few estimated figures from industry sources for some of the other electrical gadgets installed.
This very elementary ampere utilization study could have been, needlessly, complicated by delving deeper into the nature of the continuous and intermittent ampere utilization loads and the analysis of various assumptions concerning the aircraft's operating conditions. (Wow, did I say that?)
Such an expanded study would have entailed breaking the figures down to amperes used per minute during taxiing, take-off and climb, cruise, and landing . . . including estimates of battery capacity and discharge rates for different temperature and operational conditions.
While all that would make an interesting cold weather project, such detailed utilization load information would be a waste of time for any homebuilder who merely needs to know if his alternator/ battery installation will be adequate for his kind of flying.
When making your own utilization load evaluation, use the manufacturer's current requirement data for each of the electrical units you will be using.
But even if you don't have that information, you can still get a fairly good grasp on your anticipated power consumption by using the average estimates assembled in Table 2.
Keep in mind the fact that many of the older radios may have a higher current draw than the newer models. If applicable, adjust your estimates accordingly.
After your alternator/battery selection has been resolved, you probably are wondering where to begin with the wiring job ahead.
If you allow your thoughts to dwell on the complicated maze of wiring and the countless electrical connections that you will have to make, it is understandable that you may become a little apprehensive.
However, there is really no need for such concern because the complexity is more visual than real. The appearance of complexity is due to the disorganized appearance of the many wires which seemingly run in all directions.
Admittedly, before the wires are all gathered, tied, bundled and otherwise subdued, the scene does look more like the aftermath of a spaghetti factory explosion than it does a good aircraft electrical installation.
This typical array of electrical components and connections seems all the more hopeless because most of the wiring has to be concentrated within the close confines of the space behind the instrument panel.
DIVIDE AND CONQUER
Here’s a sensible way to begin developing your electrical system. Concentrate your initial attention on one electrical unit, such as a light, horn, motor or whatever, and complete its connections and installation BEFORE concerning yourself with other circuits . . . in other words, divide and conquer.
After that, get started on another installation, and then another. By completing the wiring of all the other circuits one by one, you too will have created an impressive maze of wiring that, believe it or not, is your completed aircraft electrical system.
THE TYPICAL CIRCUIT
You might liken the typical aircraft electrical circuit to a race track. The electrical starting gate is the bus bar which serves as the power source for each piece of electrical equipment you install. And like the race track's finish line, the electrical current, after it races through the circuit, terminates at a common aircraft ground return.
If we were to break a typical circuit down into its basic elements, you would find that just about every one of them will be made up of the following:
1. A circuit breaker, or fuse, one side of which is connected directly to the bus bar. The breaker's (or fuse's) function is to protect the wire from overheating or catching fire in the event of a short circuit or other faulty condition.
2. A switch is next in line. Its purpose, of course, is to control the operation of the electrical unit (light or motor) served by the circuit by turning it ON or OFF.
3. From the switch, the circuit wire will continue "downstream" to the electrical unit (light, motor, horn, etc.) to be operated.
4. Finally, the wiring terminates at the aircraft ground terminal.
Incidentally, some electrical accessories (lights, horns, relays, etc.) are automatically grounded through their metal cases when attached to a metal aircraft's structure.
Other units, such as motors, will usually have a separate ground wire which must be attached to the aircraft ground in order to complete the circuit.
In other instances, instruments and lights will have a separate ground terminal to which a suitable wire must be attached and routed to the nearest aircraft common ground return (ground terminal).
In a metal airplane this grounding can be accomplished by connecting a short wire from the electrical unit to any adjacent part of the metal structure.
However, wood and composite aircraft may require a much longer wire which has to be strung to the nearest ground terminal.
IT TAKES TWO TO TANGO
As most of you know, two separate electrical systems are installed in most homebuilts.
One is the engine's magneto system and the other is the aircraft's electrical system.
Each system is completely independent of the other.
Once the engine is started, the magneto system takes over the engine operation duties and needs no help from the aircraft electrical system.
The magneto system will keep the engine running and happy regardless of what calamity may befall the aircraft electrical system in flight.
As for the aircraft's electrical installation, think of it as having two very important functional elements. One is the alternator (or generator), and the other is the battery.
NO HELP FROM YOUR PLANS?
Because only a very few aircraft plans include a designer recommended electrical installation, the chances are that you will have to pinch hit as the designer as well as the fabricator of your own electrical system.
What this means is that it will be up to you to decide what electrical equipment you will need (or want to install), determine how much electrical capacity will be adequate for all operating conditions, select the correct wire sizes, terminal connectors, breakers (or fuses), and switches . . . and, finally, decide where to locate all that stuff.
Since there is no single "best way" to develop and install an original electrical system in a homebuilt, there is no use looking for one.
You could, for example, begin by hooking up the various pieces of equipment you have, such as the strobe power pack, wing lights, antennas, etc. But sooner or later you will have to decide where and how to install the heart of any aircraft electrical system . . . the BUS BAR. It is the power source and starting point for all circuits.
Maybe a better way to undertake the development of a good electrical system would be by doing little reading, thinking and planning first. You could then follow those preliminaries with a few schematic sketches of your own to help you better visualize and understand how your electrical system will work.
The general idea is to make your changes and mistakes on paper. After all, electrical terminals and wiring - to say nothing of the equipment you may be risking - can add up to big bucks if you have to keep reworking the wiring and replacing parts.
SCHEMATIC WIRING DIAGRAMS
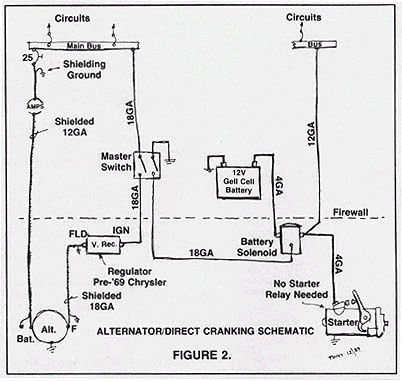
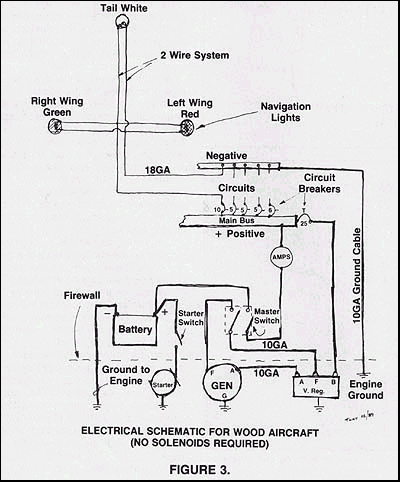
The time proven way to work out an electrical system is with the help of a few free hand schematic sketches of the various circuits. These will enable you to get a better grasp on how the system will work, and what connects to what and where.
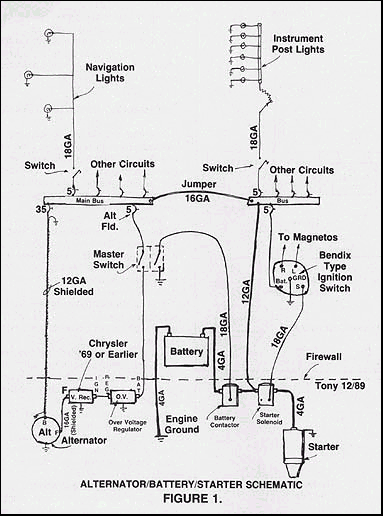
Begin with a simple schematic diagram of the Alternator/Battery System. The drawing need not be elaborate but it should include all the electrical units and the essential wiring connecting them. Include whatever notations you think will be useful (seeFigure 1).
This basic Alternator/Battery System schematic should include the heart of the typical aircraft electrical system, the bus bar.
After you are satisfied that the alternator and battery system is functional, start at the bus bar and develop a complete circuit for each piece of electrical equipment to be installed.
I suggest that you sketch each circuit on a separate sheet of 8-1/2" x 11" paper. Later you will be able to add additional information and notations as your ideas develop and changes are made.
For example, you can add the terminal sizes, wire gages, cable lengths, and any other notes which will be very useful for maintenance and trouble shooting.
Assemble these separate circuit drawings in a loose leaf notebook and they will always be handy as a ready reference.
SOME INSTALLATION CONSIDERATIONS
Unfortunately, the electrical installation in a homebuilt is seldom pre-planned and must, therefore, be fitted into an airframe structure that has already been completed.
What this generally means is that protected holes and openings necessary for routing the wires and antennae cables through parts of the structure may not have been provided during construction.
And, perhaps, a few of the major accessories you so eagerly installed are now found to be poorly located.
You may also find that some of the wires will have to be strung through, or located in, areas that are no longer readily accessible. From a future maintenance point of view, this could be considered a serious deficiency.
Before you begin any wiring, give careful attention to finding the most favorable locations for the following major pieces of electrical equipment:
Battery
Bus bar(s)
Battery contactor
Starter contactor
Voltage regulator
Over voltage regulator (optional)
Auxiliary fuel pump
Strobe light power supply
Intercom Radio mike and phone jacks
Try to visualize how the cables and wires will have to run to and from those components so as to eliminate excessive crisscrossing of wires.


