Battery Isolators
BY Bob Nuckolls (originally published in EAA Sport Aviation, December 1995)
Many builders are putting two batteries in their airplanes. Sometimes the craft is a seaplane; it's a real bummer to discover a battery that is too pooped to start an engine while the wind blows the airplane further from shore! Additional reasons for redundancy in chunks of lead include providing independent power for the second half of a dual electronic ignition system. Some alternators do not run well without a battery online; a second battery may be insurance against failure of a single battery or battery contactor that compromises the whole system. Whatever the reason, adding a second battery is no big deal if you have the space and can carry the weight.
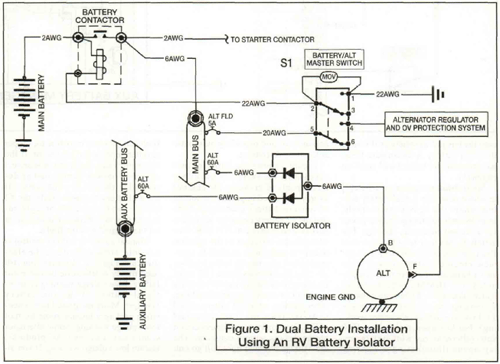
In recent years I've read several aviation articles in which the author suggests incorporation of a recreational vehicle battery isolator for charging two batteries in an airplane. A battery isolator is two silicon diodes wired per Figure 1. When used as intended, an alternator may simultaneously service two batteries: one in a camping trailer, the other in a truck or other tow vehicle. The idea is to provide isolation, preventing the truck's electrical system from loading the trailer's battery. Dual batteries in airplanes are considered differently. There are times when the system that charges the battery needs to load it. In this case, a solid high current connection is required between the #2 battery and the bus. If the #2 battery has any significant delivery capabilities then a battery contactor will bring it the main battery. A ten ampere-hour, gas recombinant battery will crank an engine [l].
Sport Aviation carried an article[2] in which describes a dual battery system where the #2 battery is small; intended only to provide backup power for a second electronic ignition. The article shows how to construct what I've called an ignition battery management module (IBMM) using a relay and a handful of electronic components. The IBMM connects the #2 battery directly to the bus interconnect by closing the relay any time bus is 13.0 volts or higher (alternator working). For bus operation below 13.0 volts (alternator not working), the relay opens illuminating a warning annunciator and providing automatic aux battery disconnect.
Figure 2 shows two batteries (not necessarily the same size but either one capable of cranking the engine) simply connected in parallel by means of separate battery contactors. Note that the #2 battery contactor has a control switch labeled AUTO/ON. I've illustrated a variation of the ignition battery management module to automatically bring the #2 battery online any time the bus rises above 13.0 volts. Either or both battery master switches may be ON during engine cranking. After starting, return #2 battery switch to AUTO. When the alternator comes online, the battery management circuit closes the aux battery contactor. The low voltage warning light will go out. Both batteries will be online for proper maintenance by the alternator. If the alternator fails, automatic disconnect of the #2 battery occurs just as described in the article cited earlier. If the #1 battery contactor fails, the #2 battery can be manually brought online to provide alternator stabilization for the remainder of the flight.
Manual auxiliary battery control is possible: simply eliminate the electronics in Figure 2. However, you still need timely notification of alternator failure. Low voltage warning is an integral feature of the aux battery manager. Many integrated instrumentation packages include some form of low voltage warning. Some alternator controllers (like the B&C products) feature low voltage warning. If you already have low voltage warning, you may opt for manual control of the aux battery. During normal operations simply close both battery contactors. When a low voltage warning shows alternator failure, take appropriate steps with respect to how you wish to use the two batteries. The manual approach applies to ignition battery management as well, just replace the relay with a switch.
Battery isolators arc heavy critters that dump approximately 6% of your alternator's output in wasted heat. Depending on how they are wired, battery isolators may interfere with alternator regulator performance. If you want to make the #2 battery available for cranking, then a hard connection to bus by way of a battery contactor is required. When an aux battery contactor is present, then no battery isolator is needed to maintain the #2 battery right next to the main battery. If you anticipate an aux battery of any size for your airplane, please consider connecting it to the bus through loss-free hardware like the IBMM relay or a battery contactor. Given timely notification of alternator failure, separation of #2 battery from the bus can be effected either manually or automatically. RV battery isolators may work well on RVs with wheels but their use on RVs with wings is totally inappropriate!
If you'd like to add an aux battery to your airplane, use the following rules of thumb for estimating weights: Figure approximately one pound per ampere-hour for weight. Ten ampere- hours is about the smallest battery that will crank an engine. Batteries in this class are available both from Concorde and B&C Specialty Products. Figure approximately one pound for a contactor installation and 0.25 pounds per foot for 2AWG wire.
NOTES
[1] Nuckolls, The Batteries Are Coming, The Batteries
Arc Coming! Sport Aviation, August 1993, p. 90.
[2] Nuckolls, Ignition Battery Manager—Revisited,
Sport Aviation, August 1995, p. 83.
BIBLIOGRAPHY
Written coverage and real-time consulting services by the author on this and other electrical systems topics are available from the AeroElectric Connection, 6936 Bainbridge Rd., Wichita, KS 67226-1008.

