Aircraft Welding and Steel Tube Fabrication Part 4
A Primer for the Novice Aircraft Builder
By Budd Davisson (originally published in EAA Experimenter, November 1987)
UNDERSTANDING HEAT
Undoubtedly, a lot of folks are going to pick this up and say, "So, what's the big deal about understanding heat? If it gets hot, it gets hot." However, as you get deeper into welding together the jungle gym-like structure that is an aircraft fuselage, you will find that "ain't necessarily so." If you've got a really good handle on the concept of heat, where it goes and how to apply it, you will find your welding progresses a thousand times easier with a lot fewer glitches.
Thermal Mass/Heat Sinks
There are a couple of basic physical facts that have remained unchanged forever. One of these is that the more mass an object has, the more heat and the more time it takes for it to get hot all the way through. So, something with a lot of mass will suck up a lot of heat before it gets warm. That one physical fact is the basis for more bad welds than any other single factor.
Let's say you've got three or four tubes coming together in a cluster, or you're welding a plate onto a gear leg, which is a pretty healthy piece of tubing. This amount of metal represents a large amount of thermal mass, meaning it'll soak up heat like a sponge. As you apply the torch to a small portion of that metal, in an effort to bring a quarter-inch strip of it up to melting temperature, all the rest of the metal is trying to suck heat out of that area, so as to equalize the temperature throughout the mass/tubing. Bearing in mind that a welding torch has a flame at the tip in excess of 7,000 degrees, you can easily see where you can get a small portion of the metal hot enough to melt. However, the tubing is trying to pull the heat out of that immediate area so quickly that the area that is being melted will be restricted to that portion directly in front of the tip, and the heat penetration into the surrounding area may be mediocre to awful. That's not what a good weld requires . . . it requires distributed heat penetration in an area that may be as much as five to six times the thickness of the material being welded, as much as an eighth or quarter of an inch on either side of the weld joint. If, however, the surrounding metal keeps sucking the heat out, it's quite possible to get what appears to be a well-melted joint, when what is actually happening is the surface is melting, but directly underneath that the heat is being sucked away to other areas and the material is not melted.
Understanding that the parent material is trying to pull the heat away from the point of application (heat shrinking), the obvious answer is to feed the area as much heat as it can absorb before you try to weld. Then, when you bring the torch tip down to begin the weld, the area already is saturated with heat, and the additional that you put into the weld area is that which is required to guarantee good heat penetration and surface melting. So, the magic word is PREHEAT.
Preheating: Don't Ignore It
It's impossible to underestimate the value of, and importance of, preheating in aircraft welding. All the rest of your techniques can be a little bit on the ragged side so long as you preheat every joint and every weld so as to give yourself a better possibility of good penetration. Every time you set down with the torch, even though you see the surface coming up to temperature almost immediately because the material is fairly thin, think "preheat," and play the flame around the immediate area for awhile to get a nice, dull cherry-red glow well ahead of the area you will be welding. More on this later.
Heat Sink Buildup
Keeping thermal mass in mind, think about what is happening as you take two or three pieces of tubing and begin welding them together in a cluster. The first joint is no sweat because you've only got two pieces of tubing that you're welding together, so there's only a certain amount of metal that's trying to sink the heat out of that area. But, when those two pieces are welded together, and you start to weld the third one in place, you are fighting a lot more thermal mass. So, as you build a cluster joint, what you are also doing is building a heat sink, which is increasing the thermal mass so rapidly that your ability to keep up with it becomes much more critical. You have to mentally stay ahead of the structure, which is conspiring against you to take more and more heat out of the area. Once again, the magic word is "Preheat." More than that, however, you will find the joint's increasing demand for heat will force you into using higher torch settings and eventually bigger tips.
The name of the game is to understand the material and its incredible thirst for heat. So, if you quench that thirst first by force-feeding it lots of heat in the pre-heating stage and bear in mind what effect the buildup in mass is having on the weld, you'll be ahead of the weld at all times.
THE BASIC WELD
We are now going to try to describe the actual act of welding, which is almost as difficult as giving all the nuances required for a perfect kiss: We can give you the basic techniques, but only practice is going to make it really work. The basic guidelines you'll read about are absolutely applicable, but you have to light up the torch and start heating metal before you will see what we're talking about, when we discuss the different colors of torch flames and the appearance of a puddle that's too hot or too cold. Also, these basic techniques are just that: "basic." You have to modify each one of them to fit the joints and the assembly at hand because, as your practice will show you, each joint requires a very subtle variation on a theme. The basics apply but the application is always slightly different.
The Weld Puddle
You hear welders talking a lot about the "puddle" and how it looks and how it moves. The reason you hear so much about it is because the puddle, what it looks like and how you control it is the determining factor in what kind of a weld you're going to wind up with. Rather than try to define the puddle, let's discuss where it comes from: Let's say you have two pieces of metal butt-jointed together. It can be tubing or plate - it doesn't make any difference-and you bring the torch tip up to sixteenth of an inch or so away from it. As the metal gets hotter and hotter, the point directly in front of the tip, and hopefully on both sides of the weld joint, will begin to change color, and you will see it start to "sweat" as the very outer part of the surface begins to melt. If you've got the torch tip set correctly (we'll show you how, later), the tiny beads of sweat will quickly join into one little droplet-sized area of molten metal. The size of the puddle will vary, depending upon the size of the tip you're using and the thickness of the metal you are trying to weld; in general, however, it looks like a droplet of molten steel and behaves exactly as a droplet of water would behave. It moves according to the general laws of surface tension, just like water, so that if you "wet" the surface by melting it at a point away from the puddle, the puddle will quickly move to join it.
In appearance, the puddle should be a tranquil droplet of molten metal that appears to have dug its way slightly into the surface of the metal. The edges of the sheet or tubing to be joined will be eaten away to about half of their thickness, and that molten metal will have flowed into the puddle. The leading edge of the puddle is actually sunken into the material slightly.
It's important that the surface of the puddle be tranquil, with no boiling and no violent activity. Ideally, it should look like yellowish-red (through the glasses) droplet of onion soup with a slight layer of cheese floating on the top (that's surface contamination floating to the top). If it has any undue activity, such as a boiling appearance, you've got too much heat going into it, and you should either use a smaller tip, turn the one you've got down a little, or back the torch further away. There are other ways of controlling the heat buildup, and here, too, we'll get into that when we get into actually doing the weld.
Quite a number of things affect the puddle other than strictly the heat being fed into it. For one thing, if the surface of the metal has any impurities, such as "scale" (the black scaly-looking stuff on metal that's been heated before), the parent metal will be partially insulated, and it will take a lot more heat to get it hot enough to melt. Then, when it does melt, it's over temperature, and the puddle will appear to be boiling and probably throwing off sparks, indicating oxidation is taking place. So a relatively clean surface to be welded is important.
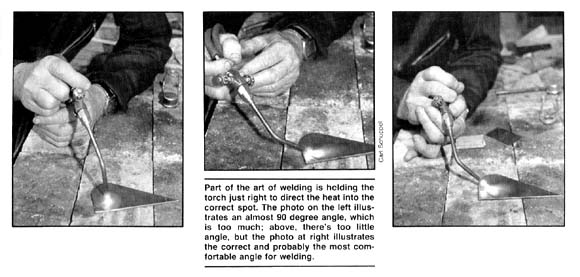
As we will show later, you can also control the size and direction in which the puddle moves by the angle at which you point the torch toward the surface. A torch that is perfectly vertical to the surface is feeding all its heat 90 degrees into the surface, which causes a puddle to develop in a given point, which will remain stationary. If you angle the torch to the surface at approximately 30 degrees, the heat will tend to move away from the torch, and, when the puddle develops, it will have a leading and a trailing edge. The front part of the puddle will be slightly concave as it melts and runs along both sides of the joint, and the backside of the puddle will be rounded and perfectly melted.
If you consider the welding torch to be a garden hose that's spraying high intensity heat, you will be able to better visualize what you are doing as you try to control the heat buildup in the puddle. The torch held 90 degrees to the surface is trying to flow heat out all over the place, just like a garden hose pointed directly at a wall. As you angle in the direction you want to weld, the flow of heat takes a more refined shape, and you are able to direct it where you want. Also, the angle and the proximity of the flame to the surface gives you the ability to heat and cool a given area at will - if it's getting too hot, you can momentarily steer the tip of the flame up and away from the workpiece, at the same time backing away for just a second, which will stop the flow of heat into the weld puddle and allow it to stabilize and cool slightly (remember, the parent metal is always trying to suck that heat out of the area).
The ability to control the heat buildup in the puddle and the adjacent workpieces, in combination with the welding rod technique, is what spells the difference between a good welder and a mediocre welder, and there is absolutely no way that you will learn it from a book. It's one of those skills that straddles the fence between science and art and has just a little bit of magic thrown in for flavor. The operative words are practice and understanding, neither one of which can produce a top-level weld job without the other.
The Importance of Posture
The foregoing paragraphs tell you what you're trying to do. Now we're going to tell you how to do it; and the first step of that is to discuss the importance of a stable position, one that gives you greater control over the welding process. Don't laugh! Although it may sound elementary, the concept of trying to give themselves some sort of steady rest for better control has never occurred to a lot of welders.
When you are welding you are bringing about a dozen factors to play on an area a quarter of an inch wide. You're concerned with torch setting, temperature, torch angle, feeding the rod, keeping the area warm, and lots of other things that will come to mind when you're at work. The last thing you need is to be plagued with a situation that demands you work suspended in space, which is exactly what you're trying to do if you walk up to a weld, pick up a torch and start blazing away at it. We're not chopping down trees here, so we don't need a tremendous amount of movement or flexibility. What we need is a tripod-effect to remove the trembling of our hands.
You don't need much to produce a steady situation that will make your welds a thousand percent easier. Just rest your hip against your band saw, bench, or whatever while you're welding; or, better yet, keep a small milk stool around the shop so you can put one foot up on it and rest your arm on the top of your knee. It doesn't have to be much, but it is critical that you realize that much of the quality of your weld is directly related to your ability to keep the torch and welding rod in a fixed position of control - something which isn't easy when you get tired and your hands are moving around like leaves in the wind.
Besides striving for a stable welding position, you should be aware that it is easier for a right-hander to weld from right to left (reverse for a lefthander), and in a nearly horizontal position. While there are a lot of places on a fuselage that don't allow you do to this, every possible effort should be made to give yourself the benefit of a more natural welding situation, i.e. right to left and horizontal. When we start talking about assembling fuselages, we'll talk about rotating welding jigs and other methods of giving yourself easy access to the weld. Again, it may sound like a small thing, but when all of these details are added together, they not only make for a much better weld, they make the job much easier and more enjoyable.
Rod Handling Techniques
There are various types of rod handling techniques which go with different welding techniques, i.e. forehand, backhand, overhead, etc. etc. However, all of the techniques have one thing in common, and that is the proper method of putting the filler rod into the weld puddle.
If you carefully examine a completed weld (a good one, anyway), you will notice that it appears to be a series of ridges or small rings one right after the other. What those are is a series of steps in which a puddle is developed and then the weld rod is deposited in the puddle, the torch is moved forwards, leaving behind a trail of ridges that are the edges of the solidified puddle made each time the filler rod is melted into the weld. To do this requires a certain amount of finesse, as well as understanding as to what the filler rod is supposed to do as well as what it is capable of doing.
One of the first problems you are likely to have in making a weld is either sticking the rod to the surface or melting it at such a high altitude that it drops into the puddle like bird droppings (one of the more common descriptions of a bad weld, by the way). Since the filler rod is so small, it melts almost instantly upon entering the cone of heat between the puddle and the torch tip. A problem can arise when the welder forgets that a long, skinny piece of welding rod is also a heat sink, and shoving it into the puddle can cool the puddle off. This leaves a 36-inch antenna stuck into the weld.
Part of the problem of rod control can be traced back to how it's being held. Because it is so flexible, the closer you can hold it to the tip, the better; but bear in mind, there's a lot of heat boiling out of the weld, and you'll fry some fingers if you get too close. If you get more than five or six inches away from the tip, however, there is so much flexibility that you can't put the tip of the rod exactly where you want it.
The next question is: exactly where do you want to put the rod? In a normal weld, moving right to left, with the torch tip angled 30-45 degrees to the work surface, your puddle will have a slight concavity in the "downwind" side. If you ever so gently dip the tip of the rod into the puddle and then pull it away, the heat of the puddle and the torch will extract exactly the right size droplet of molten metal from the welding rod and leave it deposited at the forward edge of the puddle. That's where finesse is important: you don't jab it, you don't stab it, you don't dip it-you very gently touch the tip of the rod to the edge of the puddle in the middle of the joint and take it out just as quickly. The heat will take care of the rest.
After you have practiced a bit, you will find that, if you have a little too much heat in the puddle you can cool it off by quickly melting an excess amount of rod into the puddle and moving forward a little faster than necessary. But this is an acquired skill, not an explainable technique.
In the normal forehand welding technique (torch is angled to the left, moving toward the left, and feeding the rod in at the front edge), the rod is coming in to the gap between the puddle and the flame in such a way that it is preheated and melts instantaneously.
Beginning the weld
Let's go through a mythical straight-line weld from start to finish. We'll skip a few of the nuances that we'll pick up later on that pertain to different types of joints, but, in general, this is the routine you'll be going through:
Attaching regulators. Before attaching the regulators to the tanks, crack each valve for just a second to let it blow any foreign matter out of the tank valve. Also, remember the acetylene regulator and hoses have left-hand threads. Tighten them tight, but don't overtighten, because all of the fittings are made of brass and are easy to strip.
Setting up regulators. Be sure the pressure adjustment knobs or handles on the regulators are screwed out loose, and turn on the tank valves. Never turn on the tanks with the pressure knob screwed in, or the pressure spike may damage the internal diaphragms. Now screw the oxygen and acetylene pressure valves in until both pressure gauges read the desired pressures. Let's use 8 Ibs. on each, for demonstration purposes.
Lighting torch. Turn the acetylene valve on the torch open slightly and strike the torch lighter in front of it. The resulting yellow flame will put soot on the ceiling very quickly, so crack the oxygen valve to balance it out. If you open the acetylene valve too far initially, when you light the acetylene there will be a gap between the flame and the torch tip. Retard the acetylene valve on the torch until the flame reattaches itself to the torch tip. (See Figure 1).
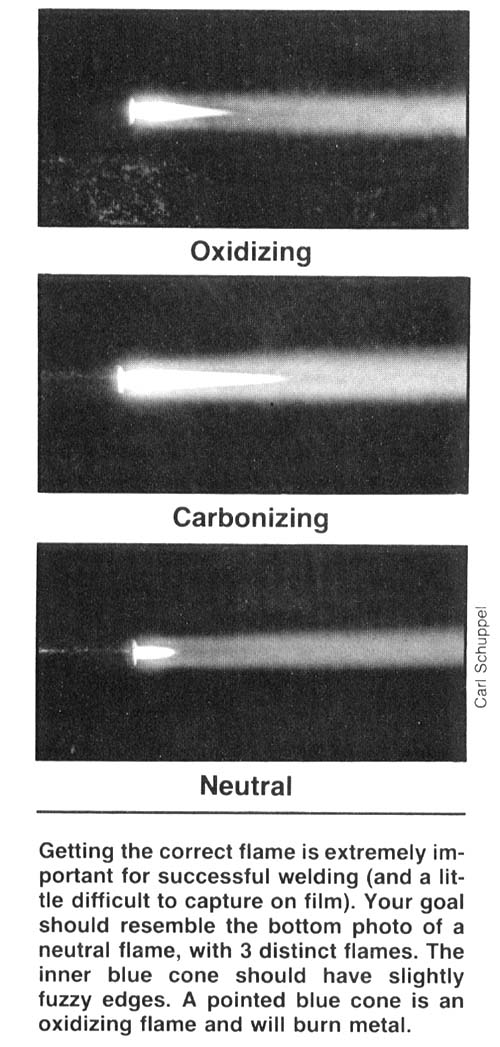
Set flame. A so-called "neutral" flame is used in welding almost all types of steel (See Figure 3).You will notice when you open the oxygen valve and more oxygen is added to an acetylene flame, the long, inner light-blue envelope of the flames starts to get shorter and shorter until all that is left is an inner cone. That inner cone should have a reasonable amount of blue color to it, and the sides of the cone should be slightly curved and slightly fuzzy. As you further increase the oxygen, the inner cone becomes very pointed and angular and loses some of its color. This is an oxidizing flame and it burns metal. A neutral flame will not oxidize metal as long as you don't leave it in one place too long. If you leave too much of a "feather" on the inner cone, you have a carbonizing flame, and too much of a feather will produce brittle welds.
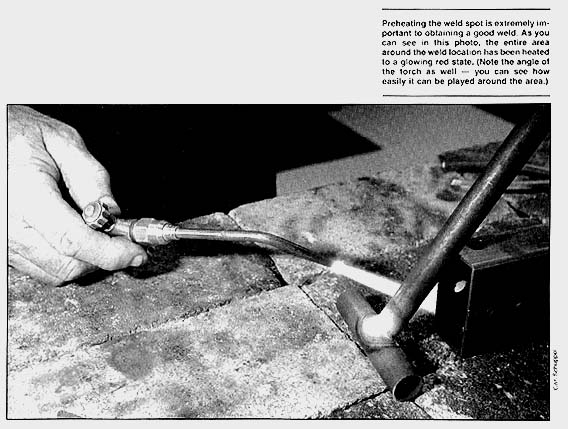
Preheat. Approach the joint with the flame and hold the inner cone a half an inch away from the surface and move back and forth in an area an inch or two in the direction you want to weld (See Figure 4). Keep moving this around until you have an area the size of a quarter that is a dull-to-bright red with no trace of yellow in it. You'll know you've saturated the area with heat when you can pull the torch away for a second and the color doesn't immediately disappear. If the color immediately disappears when you take the torch away, you know that heat is still flowing out into the surrounding structure.
Start the puddle. Once the area is preheated, move the torch tip down to where it is inclined approximately 30 degrees to the surface to be welded and just barely above it (See Figure 1). Do not let the inner cone touch the metal. Move the torch tip in a slightly circular fashion so that both sides of the weld are being heated.
You will see the color begin to change, and a little bit more yellow will come into the red. Soon it will begin to glisten as it starts to "sweat," and then it will actually melt and form a puddle a quarter of an inch, or so, in diameter.
Feed in rod. When you get a well-developed puddle, incline your torch a little bit farther down so it is pointed in the direction you want to move and lightly touch the tip of the welding rod to the leading edge of the puddle, where the flame is situated (See Figure 5). As soon as you have melted the tip of the welding rod into the puddle, move the torch slightly forward to keep the edge of the puddle molten and dip the rod in again. Then move the torch forward and dip the rod. Continue doing this until your arms fall off or you run out of metal.

At no time should you remove the torch rapidly from the area being welded. The whole idea is to weld the metal together and let it cool down and normalize in a slow fashion. If you yank a torch away from a weld in progress, the area will cool so quickly that you're just asking for internal stresses and cracks to develop.
Normalizing the Weld
There are many different opinions about the proper method of normalizing a weld. Many welders will come back after a structure is completely finished and reheat every weld to a cherry red, playing the torch on it, as it cools, to let the heat come out of it slowly. Other welders will continue to keep the joint hot while they are welding it, and, before they are done welding, go back and play the torch on the joint, allowing it to cool down slowly. Either method works fine, so long as it is done. This is especially true on critical high-stress areas that cannot tolerate internal cracks or locked-in stresses.
Inspecting the Weld
Once you've finished a weld, go back and look at it for any telltale signs of problems. Ideally, the edges of the weld should flow gently into the parent metal. There should be neither an abrupt increase in thickness (which causes stress concentrations at the juncture), nor should there be any gradual thinning of the parent metal at the edge of the joint, which would indicate undercutting and the attendant loss of cross-sectional area in that portion of the weld (See Figure 6).
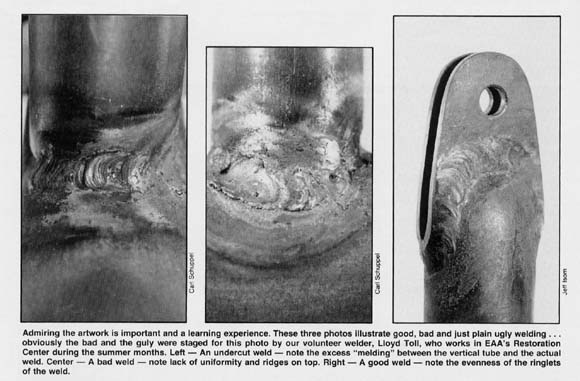
A perfect weld is a pretty weld in which the ringlets formed by the drops of filler rod being applied are evenly spaced and perfectly in line. But don't let a pretty weld fool you. The only way you will know whether or not a weld is actually good is by watching as it goes in. You watch to see that the puddle has penetrated the surface of both pieces of metal adequately, and that the rod was gently applied in such a way that there was never any cooling of the inner part of the puddle. If this is done properly, the strength of the weld should be nearly that of the parent metal.
